BBO Vugraph - The South American Zonal Trials
We have crossed the Atlantic Ocean to South America to visit the South American ...
Heading homeward for the New Year, we have stopped briefly in Indore which, at an elevation of 1,800 feet, is the highest of the major cities in central India. With a population marginally less than Houston, Texas, Indore is the largest city in the state of Madhya Pradesh. We are here for the 19th Yeshwant Rao Holkar Bridge Championships and, specifically, the final of the Kalani Trophy for the Open Teams title.
A total of 52 teams sat down for the Swiss qualifying stage four days ago. The top sixteen teams then qualified for the knockout stage. The perennial favourites in most major Indian team events, FORMIDABLES, went out in the Round of 16, losing 53-49 to FENESTA. Most of the other pre-tournament favorites survived to the latter stages.
In one semi-final, INDIAN CHAIN (Narendra Chitlangia, Subir Kumar Majumder, Badal Das, Pranab Bardhan, Aniruddha Bhattacharya and Partha Mukherjee) beat FENESTA 94-61. In the other, MAVERICKS (Subodh Maskara, Subhash Gupta, Jaggy Shivdasani, Sandeep Thakral, Keyzad Anklesaria and Debabrata Majumder) saw off HEMANT JALAN 95-49. (It seems that the six-player teams were expanded for the final if the names in the VuGraph records are to be believed.)
The format of the final is a 48-board match divided into four 12-board stanzas. As usual, we start with some problems. Firstly, with only your opponents vulnerable, you are West holding:
What action, if any, do you take?
Next, with both sides vulnerable, you are sitting in the West with:
What do you bid?
Finally, with only your opponents vulnerable, you hold as East:
What action, if any, do you take?
We begin midway through the opening stanza, with a bidding challenge for the East/West pairs. At the first table, MAVERICKS were in the hot seats playing a strong no-trump system…

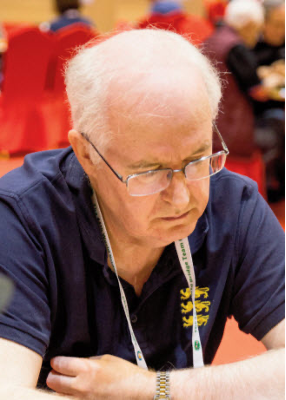
Subhash Gupta (left) was a member of Canada’s team at the 1985 Bermuda Bowl. He made his debut in the Indian Open team at the 1992 World Team Olympiad and he remained a regular member of that team for three decades. He collected his first major medal at the 2007 BFAME Championships as a member of the winning Indian Senior team. Two years later, he was back in the Open team, winning again at the same championships.
On this deal, Gupta forced to game with an artificial 2♦ after his partner’s 12-14 1NT rebid. If the partnership style was to routinely raise a major-suit response with three-card support, Subodh Maskara could perhaps have shown his strong doubleton support at the two-level, which might have simplified the auction. In their methods, 2♠ would presumably have shown three-card support, so Maskara showed his clubs. When Gupta then rebid his spades, Maskara raised, but they were already at the four-level, which left Gupta with the first of the problems posed above.
Slam is an excellent contract. It needs trumps 3-2 (or singleton jack) but, if declarer has a trump loser, there is the additional chance of finding the club finesse working plus the defender with four trumps holding at least three diamonds. That pushes the odds up to north of 80%.
Gupta demonstrated how to play, winning the opening heart lead and cashing three top spades. He then played four rounds of diamonds, pitching his heart loser. There was a trick to be lost to the ♠J, but the winning club finesse gave declarer the rest. E/W +680.

In the replay, Badal Das (right) opened a weak 1NT on the East cards. West began with a transfer to spades but, presumably, he did not then have the methods to make a slam try in spades, so he had to invent a second suit to create a force.
Das understandably liked his hand for diamonds, so he raised. Would 4♠ by West now have been an offer of an alternative contract, or showing a spade control and denying one in hearts? These are all questions to which regular partnerships should know the answer – are you sure that your partner would agree with your answers?
West moved ahead with a 4♥ cue-bid and, although Das did not co-operate with a return cue-bid, Chotan still thought his hand was worth slam. He was right but, on this layout, the winning play in a diamond slam is not one you would be likely to choose. Of course, declarer won the opening heart lead and drew trumps, relying on the spades to break. All very reasonable, but not a success as the cards lay. E/W -200 and 11 IMPs to MAVERICKS.
Declarer can make 6♦ by scoring six trump tricks to go with three spades, two clubs and the ♥A. The winning line is to win with the ♥A and play the ♣Q. North covers, so declarer cashes the ♣J and ruffs a club high. A spade to the ace allows him to ruff his last club with the other trump honour in his hand. The ♦2 returns the lead to dummy to draw trumps and the ♠K-Q brings his tally to 12 tricks at the end. Of course, this line is anti-percentage, as it fails when the ♣K is offside whilst the alternative just needs spades to break 3-2.
This board was the difference between the two teams at the end of a quiet first set that MAVERICKS won 15-4. It was a question of hand evaluation on our next deal, from the middle of the second stanza.

West was faced with the second of this week’s problems after his partner’s double of North’s 1♥ opening. With 9 HCP, the hand is worth either 1NT or 3♦, but both are clearly flawed, the former by the lack of a real heart stopper and the latter by the quality of the diamond suit. So, it is understandable why Subir Kumar Majumder settled for the underbid of 2♦.
The next problem, what to bid over North’s 2♥, fell to Narendra Chitlangia (left). Is this East hand too good to just bid 3♦? With partner having shown a hand in the 0-7 HCP range, what game are you hoping to make? Perhaps 4♦ is an alternative, but Chitlangia wanted to keep 3NT in the picture, so he advanced with a stop-asking cue-bid. What should West then bid after South’s double?
Regular partnerships might want to discuss what a redouble should show in this type of auction. One option is a transferable stopper such as Axx, so that partner can bid 3NT from the right side with a holding such as Qx. Alternatively, you might also use a redouble to show a maximum for your previous bidding, so a hand such as this West hand. I have given this problem to a number of players and all I have asked have thought that a jump to 5♦ is clear.
At the table, West not only passed but, when his partner then retreated to 4♦, he passed again. Can it really be right to bid this West hand in exactly the same way that you would bid a hand with the same shape but no high cards at all? Declarer made eleven tricks: An unimpressive E/W +150.

At this table, South bid 1NT over East’s takeout double of 1♥. West would seem to have a routine double but Debabrata Majumder (right) elected to make a free bid of 2♦, which worked out very well for his side. Once his partner had shown some values, 3♦ was clearly not enough on that East hand so, here too, East advanced with a 3♥ cue-bid. Majumder temporized with a waiting 3♠ bid and Keyzad Anklesaria jumped to game in diamonds.
The defence began with a top heart and then a club switch. Majumder cashed two top diamonds from dummy, revealing a loser in that suit. No matter, declarer could play three top winners in the black suits and crossruff for eleven tricks. North could score his ♦Q anytime he wished, but that was to be the second and last trick for the defenders. E/W +600 and 10 IMPs to MAVERICKS.
On the very next deal, both East players had to answer the last of this week’s problems.

This was one of those deals on which neither side could make anything much, so defending was the right choice. Chitlangia chose to overcall 1♠ on the East hand. Jaggy Shivdasani (left) had just enough for a heart raise and no one else had anything to say.
To go plus, Chitlangia still had to find the winning opening, and he accurately began with the ♣A and a second club. Winning with the ♣K, Subir Majumder correctly played a third round of the suit to kill declarer’s potential discard on the ♣Q. Declarer pitched his diamond loser, so East made his singleton trump. Declarer won the diamond switch with the now-bare ace and laid down the ♥A to get the bad news in that suit. Thakral ended with only six tricks: N/S -200.
Perhaps attracted by the vulnerability, Keyzad Anklesaria opted for a Michaels cue-bid, showing spades and a minor. No doubt delighted by that development (Not!), Debabrata Majumder had no way to stop in the best spot for his side (3♣). He managed to manoeuvre himself into diamonds at the lowest available level, but that was already too high. The only good news was that no one found a double. Declarer managed to scramble six tricks here too: N/S +150 and 8 IMPs out of nowhere to INDIAN CHAIN.
INDIAN CHAIN won the second stanza 31-27, so they trailed by 9 IMPs, 44-35 at the midway point of this final. The margin was reduced to just 2 IMPs on the opening lead of the third stanza. And then came a deal on which the old adage that fortune favours the brave was certainly true.
Facing a passed partner, would you come in vulnerable on that West hand over South’s 15-17 1NT opening? For INDIAN CHAIN, Chotan decided to pass. He led the ♠Q against 1NT, and the defenders cashed the first six tricks. However, Shivdasani had five diamond winners and two aces left when West eventually ran out of spades. E/W -90.

In the same position, Debabrata Majumder fearlessly climbed in with a 2♦ Multi-Landy bid, showing a one-suited hand with length in one of the majors. Keyzad Anklesaria (right) liked his hand enough to jump to 3♥, showing invitational value in whichever major his partner held. Rather optimistically, perhaps, Majumder decided he had something to spare, so he accepted the invite and jumped to game.
With three side-suit aces missing, it all came down to avoiding a trump loser. With the auction marking South with the vast majority of the defenders’ high cards, the odds were certainly against declarer. However, today was his lucky day and the contract rolled home when North’s only high card turned out to be the ♠K. E/W +620 and 12 IMPs to MAVERICKS to start what would turn out to be an explosive third stanza.
With 22 boards still to be played, it was MAVERICKS with a 14-IMP advantage.
We will be back soon with highlights from the second half of this final.